Check your version
This post assumes you're using React Router v4. If not, find your version below.If you're reading this, you've probably discovered that React Router v4 doesn't come with a built-in solution for animated transitions. That ties into React Router's philosophy - it gives you routing primitives that you can build on and trusts you can figure out the rest. Because every app has different needs, this approach is typically the safest. The downside of this is that it'll take some extra work to get the exact functionality you want. The tool we'll be using alongside React Router in this post is "React Transition Group." React Transition Group is an animation library that gives us a way to perform animations when a React component enters or leaves the DOM, which, paired with React Router v4, is exactly what we want.
Because a lot is going on in this post, there's going to be some setup we need to take before we even start talking about animations. Feel free to skip ahead if you'd like.
First, let's walk through the type of app we're going to be building. Animations aside, the goal is to make it so the user can go to /hsl/:h/:s/:l or /rgb/:r/:g/:b and see the associated HSL or RGB color for those URL parameters.
You can play with the full example here.
To do this, we'll rely heavily on React Router v4's "URL Parameters". If you're not familiar with those, I recommend reading URL Parameters with React Router v4 before continuing.
By playing with the final app, we know we're going to need a few different things before we even start looking at animated transitions.
- An app skeleton
- A navbar
- A component to render when the path matches "/rgb/:r/:g/:b"
- Another component to render when the path matches "/hsl/:h/:s/:l"
- Some "Route"s which are going to render the components we create in steps #4 and #5.
Let's start off tackling #1. We'll create a basic component which renders a Router and has some styles applied to the main div so the background color will take up the whole view like seen in the final app. We'll use a very simple "CSS in JS" object for our styles.
import React from "react";import {BrowserRouter as Router,Link,Route, // for laterRedirect, // for laterSwitch, // for later} from "react-router-dom";class App extends React.Component {render() {return (<Router><div style={styles.fill}></div></Router>);}}let styles = {};styles.fill = {position: "absolute",left: 0,right: 0,top: 0,bottom: 0,};
Cool. So our app really isn't doing anything yet. Next, let's move to the navbar. It should be pretty straight forward. We'll have 6 different Links linking between 3 HSL colors and 3 RGB colors.
class App extends React.Component {render() {return (<Router><div style={styles.fill}><ul style={styles.nav}><NavLink to="/hsl/0/89/55">Red</NavLink><NavLink to="/hsl/278/81/54">Purple</NavLink><NavLink to="/hsl/214/82/55">Blue</NavLink><NavLink to="/rgb/244/247/62">Yellow</NavLink><NavLink to="/rgb/235/48/193">Pink</NavLink><NavLink to="/rgb/47/235/210">Aqua</NavLink></ul></div></Router>);}}const NavLink = (props) => (<li style={styles.navItem}><Link {...props} style={{ color: "inherit" }} /></li>);let styles = {};styles.fill = {position: "absolute",left: 0,right: 0,top: 0,bottom: 0,};styles.nav = {padding: 0,margin: 0,top: 0,height: "40px",width: "100%",display: "flex",background: "#282c35",};styles.navItem = {textAlign: "center",flex: 1,listStyleType: "none",padding: "10px",};
Solid. Next up, we want to build a "component to render when the path matches /rgb/:r/:g/:b". This is where the URL parameters will come into play. Remember, this component will eventually be rendered when the path matches /rgb/:r/:g/:b. What that means is it will be passed three different url parameters, r, g, and b. We need to grab those values and make their RGB value the background of the whole view.
...const RGB = ({ match }) => {const { params } = matchreturn (<div style={{...styles.rgb,background: `rgb(${params.r}, ${params.g}, ${params.b})`}}>rgb({params.r}, {params.g}, {params.b})</div>)}...styles.rgb = {...styles.fill,color: 'white',paddingTop: '20px',fontSize: '30px'}
Next up, we need to do the exact same thing we just barely did with the RGB component but this time, for a HSL component that matches /hsl/:h/:s/:l.
...const HSL = ({ match }) => {const { params } = matchreturn (<div style={{...styles.hsl,background: `hsl(${params.h}, ${params.s}%, ${params.l}%)`}}>hsl({params.h}, {params.s}%, {params.l}%)</div>)}...styles.hsl = {...styles.fill,color: 'white',paddingTop: '20px',fontSize: '30px'}
Now that we have our app skeleton, the navbar, the RGB and HSL components, and some styling, the next thing we need to do is actually render some Routes so that when the path matches, the appropriate components will get rendered. Because we're going to have a "catch all" route, we'll go ahead and throw our Routes inside of a Switch component. (For more info on "catch-all" routes, visit Handling 404 pages (catch-all routes) with React Router v4)
...render() {return (<Router><div style={styles.fill}><ul style={styles.nav}><NavLink to="/hsl/10/90/50">Red</NavLink><NavLink to="/hsl/120/100/40">Green</NavLink><NavLink to="/rgb/33/150/243">Blue</NavLink><NavLink to="/rgb/240/98/146">Pink</NavLink></ul><div style={styles.content}><Switch><Route exact path="/hsl/:h/:s/:l" component={HSL} /><Route exact path="/rgb/:r/:g/:b" component={RGB} /><Route render={() => <div>Not Found</div>} /></Switch></div></div></Router>)}...styles.content = {...styles.fill,top: '40px',textAlign: 'center'}
Beautiful. At this point, using our navbar, we can successfully navigate between those six different routes. Our HSL and RGB components are correctly parsing the URL parameters and the background we see is the associated rgb/hsl color.
Before we finally get to animated transitions, there's one more addition I want to make. Our app is currently structured so that we only have six links, none of which are for an index / page. It's probably important to handle that use case. Let's go ahead and redirect any users who try to go to the index page to one of our hsl or rgb routes we already have set up.
render() {return (<Router><div style={styles.fill}><Route exact path="/" render={() => (<Redirect to="/hsl/10/90/50"/>)}/>...</div></Router>)}
For more info on the Redirect component, visit Programmatically navigate with React Router v4.
Finally! It's the moment you've been waiting for 🚨🕺. Let's look at how to animate the transitions between our routes.
The first thing we need to do is take a look into how React Transition Group works. Like React Router, it has a component-based API. The two components we'll be using from it are TransitionGroup and CSSTransition.
First, let's look at TransitionGroup. The way you use TransitionGroup is as a wrapper component.
<TransitionGroup>{/* stuff */}</TransitionGroup>
Defined, it's a "state machine for managing the mounting and unmounting of components over time". In practice, the first thing it does is it keeps track of all of its children (props.children) inside of its local state. Then, whenever its props change and its getDerivedStateFromProps is called, it loops over the next children and figures out which are new (entering), which have been deleted (exiting), and which children have stayed the same. Once it figures that out, it clones and merges all of its children together passing to each item a few props which represent its status (exiting, entering, etc.). At this point, it updates its local state with all of the merged children (which all individually know if they're entering, exiting, or remaining the same). That causes a re-render and the new merged children is shown to the view.
Breathe
That was a lot of words to say that TransitionGroup renders all its new and old children after passing certain props to each based on if they're new, old, or the same.
You may be wondering why it renders all the old children, new children, and children that didn't change. The reason for that is for animation purposes. For example, an "old" (exiting) child might receive an animation that takes its opacity from 1 to 0. A new (entering) child might pull a Peter Thiel and receive an animation that takes its opacity from 0 to 1. Regardless, it's important to understand that all the children are going to be shown for a specified time.
The last important item to mention about TransitionGroup is the way in which it keeps track of which children are which. If you're familiar with React, you're familiar with the idea of key props. When you're mapping over an array to create a list UI, you need to give each item a unique key prop. This way, React can effectively manage that list. It's the exact same thing with TransitionGroup's children. Each child needs its own unique key prop so TransitionGroup can more effectively figure out which children have changed (entered or exited).
I realize we're pretty deep in the weeds here. Stick with me, you're doing great.
Next, we have the CSSTransition component. When you render a TransitionGroup, its direct children must either be a CSSTransition component or a Transition component (both come with the library).
What CSSTransition does is it takes the information it got from TransitionGroup, specifically if certain children are entering, leaving, or staying the same, and it applies a pair of class names to them during the 'appear', 'enter', and 'exit' stages of the transition based on their status. What this allows you to do is, based on those class names, have CSS in your app which will select the same class names that CSSTransition is applying and add some styles to those elements. For example, if we told CSSTransition to apply a fade class, our CSS might look like this.
.fade-enter {opacity: 0;z-index: 1;}.fade-enter.fade-enter-active {opacity: 1;transition: opacity 250ms ease-in;}
That way we'll adjust the opacity of an element anytime it has a class name of fade-enter (which CSSTransition will apply for us).
Alright now that we have our App set up and we understand a little bit more about React Transition Group, let's join them.
First, we know that we have to wrap everything that's going to be animating inside of TransitionGroup. Since we'll be animating our Switch component, let's wrap it in TransitionGroup.
...import { TransitionGroup } from 'react-transition-group'...render() {return (<Router><div style={styles.fill}><Route exact path="/" render={() => (<Redirect to="/hsl/10/90/50"/>)}/><ul style={styles.nav}><NavLink to="/hsl/10/90/50">Red</NavLink><NavLink to="/hsl/120/100/40">Green</NavLink><NavLink to="/rgb/33/150/243">Blue</NavLink><NavLink to="/rgb/240/98/146">Pink</NavLink></ul><div style={styles.content}><TransitionGroup><Switch><Route exact path="/hsl/:h/:s/:l" component={HSL} /><Route exact path="/rgb/:r/:g/:b" component={RGB} /><Route render={() => <div>Not Found</div>} /></Switch></TransitionGroup></div></div></Router>)}
Now as we talked about earlier, TransitionGroup only gets us part of the way there; we also need to tie in CSSTransition. Just like we did with TransitionGroup, let's go ahead and wrap our Switch inside of a CSSTransition component so we can specify some properties for how Switch will be animated. We'll pass it two props, timeout and classNames. timeout specifies how long TransitionGroup will display all of its children before removing the old children (aka how long the animation will take place). classNames is the CSS class that is applied to the component as it enters or exits.
For example, if you provide a classNames of
fade, then the following classes will be added to the component during its animation lifecycle -fade-enter,fade-enter-active,fade-exit,fade-exit-active,fade-appear, andfade-appear-active.
...import { TransitionGroup, CSSTransition } from 'react-transition-group'...render() {return (<Router><div style={styles.fill}><Route exact path="/" render={() => (<Redirect to="/hsl/10/90/50"/>)}/><ul style={styles.nav}><NavLink to="/hsl/10/90/50">Red</NavLink><NavLink to="/hsl/120/100/40">Green</NavLink><NavLink to="/rgb/33/150/243">Blue</NavLink><NavLink to="/rgb/240/98/146">Pink</NavLink></ul><div style={styles.content}><TransitionGroup><CSSTransitiontimeout={300}classNames='fade'><Switch><Route exact path="/hsl/:h/:s/:l" component={HSL} /><Route exact path="/rgb/:r/:g/:b" component={RGB} /><Route render={() => <div>Not Found</div>} /></Switch></CSSTransition></TransitionGroup></div></div></Router>)}
Now, because we've applied the classNames of fade, we need to add some CSS that will do the animation for us. Wherever your CSS is located, add the following CSS so we can animate the opacity.
.fade-enter {opacity: 0;z-index: 1;}.fade-enter.fade-enter-active {opacity: 1;transition: opacity 250ms ease-in;}
And....! It doesn't work. 😔
Remember earlier when we talked about how TransitionGroup keeps track of its children? Because we didn't give CSSTransition a unique key, whenever we switch routes, TransitionGroup just assumes nothing happened since none of its children's keys changed.
Now the question is, what should we use for a unique key? Well, what is the thing that is changing in the app? It's the app's location. So ideally, we would use that as the key since we know if the location changed, we'd want TransitionGroup to be aware of that and let CSSTransition know. Now we have another problem 😣. How do we get the app's location? We could reach out to window.location but that feels hacky since we're using React Router. There are a few different ways to accomplish this with React Router. We could use the withRouter HOC would give us access to location as well as the other router props (history and match). What we'll do in this tutorial though is render a Route without a path and use a render prop. Now that may seem weird, but if you render a Route without a path, that route will always match and, like usual, the render prop will be passed location, match, and history.
render() {return (<Router><Route render={({ location }) => (<div style={styles.fill}><Route exact path="/" render={() =><Redirect to="/hsl/0/89/55" />} /><ul style={styles.nav}><NavLink to="/hsl/0/89/55">Red</NavLink><NavLink to="/hsl/278/81/54">Purple</NavLink><NavLink to="/hsl/214/82/55">Blue</NavLink><NavLink to="/rgb/244/247/62">Yellow</NavLink><NavLink to="/rgb/235/48/193">Pink</NavLink><NavLink to="/rgb/47/235/210">Aqua</NavLink></ul><div style={styles.content}><TransitionGroup><CSSTransitiontimeout={300}classNames='fade'key={location.key}><Switch><Routeexactpath="/hsl/:h/:s/:l"component={HSL}/><Routeexactpath="/rgb/:r/:g/:b"component={RGB}/><Route render={() => <div>Not Found</div>} /></Switch></CSSTransition></TransitionGroup></div></div>)} /></Router>)}
🙏 now we have access to a unique key value in location.key and we pass that as a key prop to CSSTransition. And with that, we're done!
Just kidding 😩
You're so close! Pinky promise.
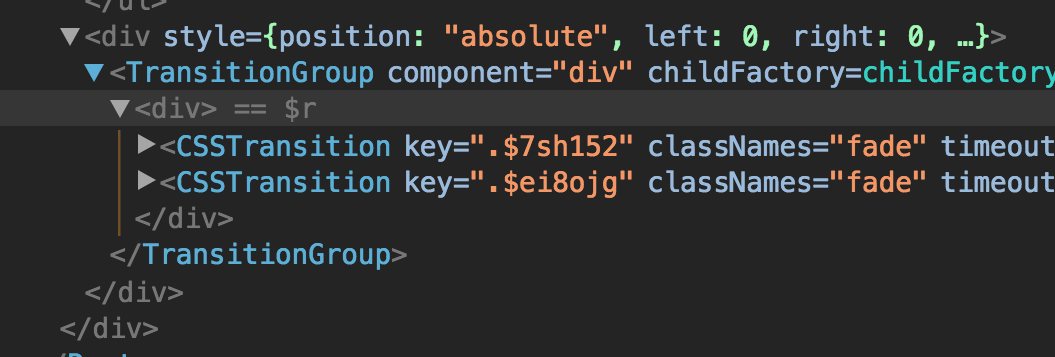
If you run the app as it currently is, you'll notice that everything seems to be working fine. When you navigate to a new link, for 300ms (timeout), you see both the new CSSTransition component and the old CSSTransition component. You can see this perfectly in the React Dev Tools screenshot below.
This is the worst kind of bug. Both the problem and the solution aren't obvious.
Here's what's happening. At that exact moment of the screenshot, if you look deeper into the CSSTransition components, the first one looks like this.

and the second looks like this

Notice that eventually CSSTransition is rendering our Switch component. That makes sense. You'll also notice that the images are the exact same except for the key props. This isn't' good and it's the reason it's not working.
Take a closer look at the Switch components in the images above. Notice that both of them have the exact same location prop. We don't want that to happen. Remember the purpose of Switch is to render the component of the first Route that matches. If the location prop is the same on both Switch components, that means that the same Route is going to match in both Switches which means the same component is going to be rendered. This means that even if the animations are occurring, we're not going to see them since both components being rendered are the same. What we need to do is figure out why the locations are the same, and how to fix them. The goal here is to make it so when TransitionGroup renders its children, the old child has the previous location while the new child has the new location. Right now, they both just have the new location.
Whenever you render a Switch component, under the hood Switch is going to get its location from context.location. You can think of it as Router keeping track of the app's current location and Switch always has access to it. This gives us a huge insight into the current issue we're having. When both Switches are rendered, they're both grabbing the location from context. By the time they render, context.location has already been updated to the new location. This means that instead of getting one Switch with the old location and one with the new location, both have the new location since both got the location from context.location. Now, how do we fix this?
When you use Switch, it takes in an optional location prop. Basically, it allows you to tell Switch "Hey, use this location instead of the location from context". Exactly what we need. Since we already have access to location from earlier when we wrapped all our code in a Route, all we have to do is pass it so Switch.
<TransitionGroup><CSSTransition key={location.key} timeout={300} classNames="fade"><Switch location={location}><Route exact path="/hsl/:h/:s/:l" component={HSL} /><Route exact path="/rgb/:r/:g/:b" component={RGB} /><Route render={() => <div>Not Found</div>} /></Switch></CSSTransition></TransitionGroup>
And just like that, it works! (for real this time).
The goal of this post was to really dive into the why of animated transitions in React Router v4 and I think we've accomplished that.
tl;dr: Wrap your Switch component inside of both TransitionGroup and CSSTransition, pass location.key to CSSTransition and pass the location to Switch.