The Web Audio API is incredibly powerful, with great support in every modern browser. It gives web developers tools to add effects to audio, create audio visualizations, generate audio, and much more.
Today, we'll be diving into the basics of the Web Audio API by creating a soundboard which allows us to click a button on the web page and play a synthesized sound. We'll generate sound effects for a drum kit, along with a few melodic tones.
Portions of this article were adapted from this article by Chris Lowis.
How does the Web Audio API work?
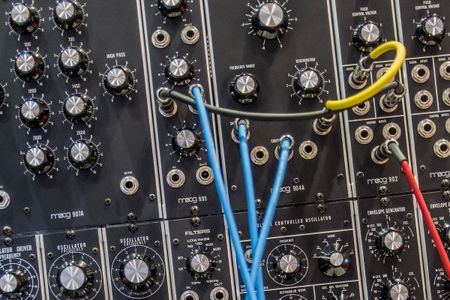
The Web Audio API is based on the concept of modular routing, which has its roots in analog synthesizers. There are audio sources, such as microphones, oscillators, and audio files, which provide some kind of audio signal.
Those audio signals can be connected to other audio nodes which perform operations with that signal. These nodes include the Gain Node, which can raise or lower the volume of a signal; Filter Nodes, which changes how the signal sounds; and an Analyser Node, which provides real-time information about a signal which can be used to render a visualization.
Finally, our audio signal is passed to an output node, which plays the signal through our computer's speakers.
Analog synthesizers use wires and circuits to create the audio nodes and connections; with the Web Audio API, we use code.
A Primer on Computer Audio
Sounds works through continuous waves in the air which our ears are able to detect. These waves move at varying frequencies, which our brain interprets as different pitches. Higher frequencies mean higher pitch. The height of each peak in the wave indicates its amplitude, or power. Waves with a high amplitude are interpreted by our brains as higher volume.
If you want to learn more about waveforms, you should check out this excellent primer by Josh Comeau.
The problem with computers is they can't process or store continuous data; computer processors can only handle one bit of data at any moment. That means when working with audio in a computer, we actually use discrete signals, which take the continuous signal and convert it into a sequence of samples, each representing what the frequency and amplitude of the signal was at that moment in time.
This is why the sample rate is so important to audiophiles - the more samples you can fit into a second of audio, the more accurate the representation is. However, it isn't a 1-to-1 match of signal frequency to sample rate. For example, the range of human hearing is 20 - 20,000 Hertz (Hz). To capture enough samples to represent that range of frequencies, you actually need more than double the source frequency. That's why the sample rate of CDs is 44,100 Hz, or 44,100 samples per second. This is also the default sample rate for the Web Audio API.
You might also have two streams of audio are stored together, such as in a stereo audio clip. The separate streams are called channels, and in stereo they correspond to the left and right speakers. If your audio has 5.1 surround sound, then it would have 6 separate channels: front left and right, center, back left and right, and the subwoofer.
The AudioContext
All of the work we do in the Web Audio API starts with the AudioContext. This is an object that gives us access to all of the other objects and constructors that we'll use as we create audio. You can think of it like document or a canvas context, but for Web Audio.
We create the audio context using the AudioContext() constructor.
const audioContext = new AudioContext();
Not every browser has full support for the Web Audio API. If you want to make your audio application work for all browsers, check out this article on MDN for some helpful tips.
Generating Audio in JavaScript
Since the Web Audio API is used in a JavaScript environment, audio has to be stored in a way that JavaScript can understand. This is done using audio buffers, which can be created with the .createBuffer method on the audio context. We have to pass it the number of channels in the buffer, the number of samples that the buffer holds, and the sample rate.
const SAMPLE_RATE = audioContext.sampleRate;const timeLength = 1; // measured in secondsconst buffer = audioContext.createBuffer(1,SAMPLE_RATE * timeLength,SAMPLE_RATE);
This gives us a mono (one channel) buffer that holds 1 second worth of audio data.
If we wanted to read the data in the buffer (which is currently empty), we could use the .getChannelData() method. We need to pass in 0 to specify which channel we want data for. This returns a Float32Array where each item is a number representing the level of that sample.
const channelData = buffer.getChannelData(0);// Float32Array {0: 0, 1: 0, ...}
We can then mutate the channel data directly. By assigning a random value between -1 and 1, we can create white noise.
for (let i = 0; i < buffer.length; i++) {channelData[i] = Math.random() * 2 - 1;}
Note: If our buffer had more than one channel, we would have to repeat this process for every channel.
Now we have a snippet of audio that contains one second of white noise. There's still more that we need to do before we can play it.
Creating Audio Nodes
We can now create a buffer source, which is an audio node that handles playing our audio buffer.
const whiteNoiseSource = audioContext.createBufferSource();whiteNoiseSource.buffer = buffer;
We can now connect this audio node to another audio node, including the audio context destination node. The destination node is a special node that is attached directly to the audio context. It represents whatever speakers are configured to play audio on our users computer.
Before we connect our white noise to the destination, we'll want to turn the volume down to make sure we don't blow our eardrums out. We'll create a gain node, which lets us control the volume. Then we'll connect our audio source node to the gain, and connect it to the destination node.
const primaryGainControl = audioContext.createGain();primaryGainControl.gain.setValueAtTime(0.05, 0);whiteNoiseSource.connect(primaryGainControl);primaryGainControl.connect(audioContext.destination);
You might be wondering why we're using the strange setValueAtTime method. The Web Audio API is designed to orchestrate complex changes the parameters of the audio nodes. The gain property on our gain node is an AudioParam and has a lot of other methods which make it possible to adjust different audio node parameters in controlled ways.
The first parameter of the setValueAtTime is the value we are setting; in this case, the gain. The gain value is unitless, and the amplitude of the audio that passes through our gain node is multiplied by that gain value. Using a value less than 1 decreases the volume; greater than 1 would increase the volume.
The second parameter is the time that the value is set, based on the internal clock of the audio context. This allows us to precisely schedule changes to the properties of our various audio nodes. Using 0 here sets the gain value at the very start of our audio.
If you've been following along, you might be expecting some noise to come out of your speakers right now. Just connecting our audio node to the destination doesn't make it play - you have to call the start method on the source node. Let's create a button that we can click to play the sound.
const button = document.createElement("button");button.innerText = "White Noise";button.addEventListener("click", () => {whiteNoiseSource.start();});document.body.appendChild(button);
Click the button, and you should hear music to your ears generated white noise!
...But if you click the button again, you get an error. You can only play a source node once. Fortunately, they are cheap to create, and we can still use the same audio buffer. We'll just create it inside our button's event listener.
button.addEventListener("click", () => {const whiteNoiseSource = audioContext.createBufferSource();whiteNoiseSource.buffer = buffer;whiteNoiseSource.connect(primaryGainControl);whiteNoiseSource.start();});
Now you can click all you want.
Creating a Snare Sound with Filters
Snare drums create their signature rattle using several springs that are held taught underneath the drum. Old 8-bit games would use a white noise generator to create a snare sound, as you can hear in this 8-bit remix of a classic song.
White noise is nice, but it doesn't sound much like any kind of musical instrument. We can build on our white noise generator to create a snare sound, using filters.
In audio processing, a filter is some process which changes an audio signal in some way. We can use a highpass filter to cut off all of the noise that exists below a certain frequency, leaving us with just the high frequencies of noise. We can create this filter using the BiquadFilterNode audio node.
To help tell the difference, lets create another button.
const snareFilter = audioContext.createBiquadFilter();snareFilter.type = "highpass";snareFilter.frequency.value = 1500; // Measured in HzsnareFilter.connect(primaryGainControl);// ...const snareButton = document.createElement("button");snareButton.innerText = "Snare";snareButton.addEventListener("click", () => {const whiteNoiseSource = audioContext.createBufferSource();whiteNoiseSource.buffer = buffer;whiteNoiseSource.connect(snareFilter);whiteNoiseSource.start();});document.body.appendChild(snareButton);
Go ahead and click on the buttons to hear the effect that the highpass filter has.
There are several other filters built into the BiquadFilterNode, which you can explore on the MDN page.
Generating Kick Drums with Oscillators
We aren't quite done with our snare yet, but we're going to take a little diversion and create our kick drum sound. The kick sound will be a low pitched hum. We could create that ourselves using another audio buffer and a sine function, but the Web Audio API gives us tools that make this a lot easier.
Let's start by creating a button. Inside the button's click event listener, we'll create an oscillator node. We'll pass it into our gain node so we don't break the speakers on our computers.
We'll also need to call the 'start' method on our oscillator.
const kickButton = document.createElement("button");kickButton.innerText = "Kick";kickButton.addEventListener("click", () => {const kickOscillator = audioContext.createOscillator();// Frequency in Hz. This corresponds to a C note.kickOscillator.frequency.setValueAtTime(261.6, 0);kickOscillator.connect(primaryGainControl);kickOscillator.start();});document.body.appendChild(kickButton);
If we were to click our button, our sound would continuously play, which is not what we want. Fortunately, we can use the stop method to tell the oscillator to stop. Naïvely, we could call stop using setTimeout, but the audio context keeps time on its own. We can pass a number to the stop method to tell it to stop at a certain time. Using the audioContext.currentTime property, we can make it stop after half a second.
kickButton.addEventListener("click", () => {const kickOscillator = audioContext.createOscillator();// Frequency in Hz. This corresponds to a C note.kickOscillator.frequency.setValueAtTime(261.6, 0);kickOscillator.connect(primaryGainControl);kickOscillator.start();// This will stop the oscillator after half a second.kickOscillator.stop(audioContext.currentTime + 0.5);});
If you listen carefully to the sound of a kick drum, you can hear that the sound actually pitches down over time. Remember, lower pitch means lower frequency. We can create this effect using the timing methods that frequency provides to us.
// Inside of our event listenerkickOscillator.frequency.setValueAtTime(150, audioContext.currentTime);kickOscillator.frequency.exponentialRampToValueAtTime(0.001,audioContext.currentTime + 0.5);
If you click the kick button now, you'll hear what sounds like a kick drum! It exponentially drops the pitch down to a frequency that is too low for humans to hear. There's only one problem - after it's done playing, there's a 'click'. Why is that?
If you think for a moment about what our speakers are doing. When we click the button, they begin vibrating. As the pitch drops, they are still vibrating, just at a much lower frequency - so low that we can't hear it. But it's still being pushed and pulled away from its neutral position. However, when the oscillator stops, the speaker suddenly snaps back, causing a rapid change in pressure. Our ears pick this up as a short 'click'.
Lets fix this by giving our oscillator its own gain node that fades out the volume with the pitch.
const kickGain = audioContext.createGain();kickGain.gain.setValueAtTime(1, 0);kickGain.gain.exponentialRampToValueAtTime(0.001,audioContext.currentTime + 0.5);kickOscillator.connect(kickGain);kickGain.connect(primaryGainControl);
Play around with the pitch and timing to see what kinds of effects you can create!
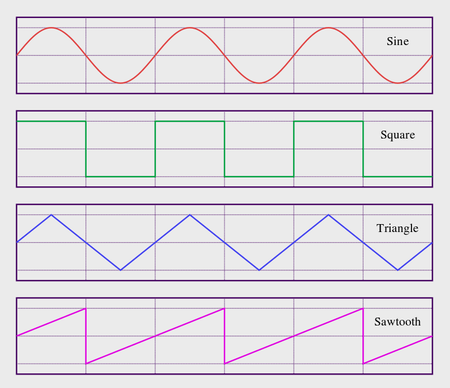
Alternate Waveforms
The oscillator node creates a sine wave by default, but it can be configured to create square, sawtooth, and triangle waves as well. Each of these has a different acoustic quality, with sine being the most "smooth", followed by triangle. Sawtooth and square waveforms have much more abrupt, or jarring sounds.
Let's take what we've learned and apply it to our snare drum. We'll create an oscillator node for our snare drum, and give it a triangular waveform. Then we'll create two gain nodes, one for the oscillator and one for the white noise, and use the exponential ramp function to fade them out individually.
snareButton.addEventListener("click", () => {const whiteNoiseSource = audioContext.createBufferSource();whiteNoiseSource.buffer = buffer;// Control the gain of our snare white noiseconst whiteNoiseGain = audioContext.createGain();whiteNoiseGain.gain.setValueAtTime(1, audioContext.currentTime);whiteNoiseGain.gain.exponentialRampToValueAtTime(0.01,audioContext.currentTime + 0.2);whiteNoiseSource.connect(whiteNoiseGain);whiteNoiseGain.connect(snareFilter);whiteNoiseSource.start();whiteNoiseSource.stop(audioContext.currentTime + 0.2);// Set up an oscillator to provide a 'snap' soundconst snareOscillator = audioContext.createOscillator();snareOscillator.type = "triangle";snareOscillator.frequency.setValueAtTime(100, audioContext.currentTime);// Control the gain of our snare oscillatorconst oscillatorGain = audioContext.createGain();oscillatorGain.gain.setValueAtTime(0.7, audioContext.currentTime);oscillatorGain.gain.exponentialRampToValueAtTime(0.01,audioContext.currentTime + 0.1);snareOscillator.connect(oscillatorGain);oscillatorGain.connect(primaryGainControl);snareOscillator.start();snareOscillator.stop(audioContext.currentTime + 0.2);});
Now our snare has a nice, punchy sound to it.
Loading Samples
Hi-hat sounds (and many sounds involving cymbals) are a little tricker to simulate using generative audio, so we will use a recording of a hi-hat sound instead. You can use whatever recording you want; I'm going to use this one, which is from Freesound.org and hosted on Unpkg.
We'll use the fetch API to download the sound, process it as an array buffer, and use the audio context decodeAudioData method to turn it into an audio buffer, much like the one we created for our white noise.
Then we can connect it to our master gain node and play it, just like any other sound.
const hihatButton = document.createElement("button");hihatButton.innerText = "Hi-hat";hihatButton.addEventListener("click", async () => {const response = await fetch("https://unpkg.com/@teropa/drumkit@1.1.0/src/assets/hatOpen2.mp3");const soundBuffer = await response.arrayBuffer();const hihatBuffer = await audioContext.decodeAudioData(soundBuffer);const hihatSource = audioContext.createBufferSource();hihatSource.buffer = hihatBuffer;hihatSource.connect(primaryGainControl);hihatSource.start();});document.body.appendChild(hihatButton);
Note that we could make this more efficient by loading and decoding the hi-hat sound outside of this event handler. For our purposes, though, this works just fine. After the first click, the audio file is loaded from the browsers disk cache.
There are ways we can modify this sound more, without even needing to apply a filter. Using the playbackRate property on the hihatSource audio source, we can speed up or slow down the playback of the sound. Since this either compresses or extends the frequency of the sound, it will also change the pitch.
hihasSource.playbackRate.setValueAtTime(0.5, 0); // Half the playback rate, which lowers the pitch.hihasSource.playbackRate.setValueAtTime(2, 0); // Double the playback rate, which raises the pitch.
It is possible to modify the signal to compensate for the pitch change, but that's outside the scope of this article. If you want to learn more about this, you can start with the Wikipedia article on Audio Time Stretching and Pitch Shifting.
Playing a Scale
Now that we have the basis for a drum set, lets try to make a simple piano. This is going to require a little bit more knowledge of music theory.
The chromatic scale that most Western music is based on consists of 12 notes, with equal distance in the pitches. The ratio between two pitches is calculated as the twelfth root of two. That means we could technically calculate the frequency values for each tone by starting at A above middle C, which is 440Hz, and then multiplying or dividing it by 2 ^ (1/12) for each note. However, since other people have done that for us, we can just use a table for all of our notes.
const notes = [{ name: "C", frequency: 261.63 },{ name: "C#", frequency: 277.18 },{ name: "D", frequency: 293.66 },{ name: "D#", frequency: 311.13 },{ name: "E", frequency: 329.63 },{ name: "F", frequency: 349.23 },{ name: "F#", frequency: 369.99 },{ name: "G", frequency: 392.0 },{ name: "G#", frequency: 415.3 },{ name: "A", frequency: 440.0 },{ name: "A#", frequency: 466.16 },{ name: "B", frequency: 493.88 },{ name: "C", frequency: 523.25 },];
Let's loop over these to create buttons for each note in the scale. We'll use a square note to create our sound.
notes.forEach(({ name, frequency }) => {const noteButton = document.createElement("button");noteButton.innerText = name;noteButton.addEventListener("click", () => {// Create an oscillator at the note's frequencyconst noteOscillator = audioContext.createOscillator();noteOscillator.type = "square";noteOscillator.frequency.setValueAtTime(frequency,audioContext.currentTime);noteOscillator.connect(primaryGainControl);noteOscillator.start();noteOscillator.stop(audioContext.currentTime + 1);});document.body.appendChild(noteButton);});
Now we have a whole list of buttons that we can click on to create notes. If we play the natural notes in order, we get a nice C scale! Our notes sound a little forced, though - and not just because we're using a square wave. We can improves this substantially by paying a bit more attention to the volume of our note.
Envelopes
No, not the kind you mail letters in. In audio, an envelope describes how a sound changes over time. Most of the time, an envelope is defined in an ADSR form: Attack time, Decay time, Sustain level, and Release time.
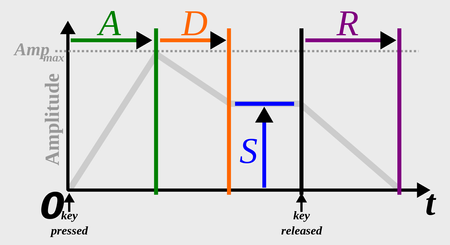
Notice that all of these are time values, except for the sustain level. If you were to press a key on a piano and then let go abruptly, you would get a very different sound profile than if you were to hold the button down for a very long time. The sustain time is determined by how long the key is held down.
We can create an ASDR envelope by adding a gain node to our oscillator and setting up timed adjustments to the gain value. We'll use this to model the attack, delay, and release time components. We'll store the sustain level in another variable, to make it easy to adjust.
noteButton.addEventListener("click", () => {// Create an oscillator at the note's frequencyconst now = audioContext.currentTime;const noteOscillator = audioContext.createOscillator();noteOscillator.type = "square";noteOscillator.frequency.setValueAtTime(frequency, now);const attackTime = 0.2;const decayTime = 0.3;const sustainLevel = 0.7;const releaseTime = 0.2;const duration = 1;const noteGain = audioContext.createGain();noteGain.gain.setValueAtTime(0, 0);noteGain.gain.linearRampToValueAtTime(1, now + attackTime);noteGain.gain.linearRampToValueAtTime(sustainLevel,now + attackTime + decayTime);noteGain.gain.setValueAtTime(sustainLevel, now + duration - releaseTime);noteGain.gain.linearRampToValueAtTime(0, now + duration);noteOscillator.start();noteOscillator.stop(now + 1);noteOscillator.connect(noteGain);noteGain.connect(primaryGainControl);});
If we want to take this to the next level, we can add vibrato. This is a very slight modulation to the frequency of a note that makes it sound more full and rich. You often see violin and other string players shaking their hand up and down as they play a note to create vibrato.
We can do this by creating another oscillator. However, instead of producing a note, this oscillator will modify our frequency value. By connecting the vibrato oscillator directly to the frequency parameter of our note oscillator, we can rapidly adjust the frequency of our note.
We'll also need to create a gain node. By default our oscillator produces values between 1 and -1. However, it's very difficult to notice a 2Hz difference in frequency. Our gain node will amplify the values, making our note have a wider oscillation.
So, the frequency of our vibrato oscillator will determine the speed of the vibrato, and the gain node will determine the intensity of the vibrato.
const vibrato = audioContext.createOscillator();vibrato.frequency.value = 10; // 10 Hzconst vibratoGain = audioContext.createGain();vibratoGain.gain.value = 1.5;vibrato.connect(vibratoGain);vibratoGain.connect(noteOscillator.frequency);vibrato.start();
It doesn't sound quite like a piano, but it's not a boring square wave sound either!
Conclusion
There's a lot you could do to improve our example. For example, you could:
- Add some styling and make it look prettier.
- Add keyboard event listeners so you can play the sounds by pressing keys on your keyboard instead of clicking.
- Randomize the frequencies for the snare and kick slightly, so each sound varies slightly.
- Play around with all of the settings to create more appealing sounds.
- Check out how visualizations can be created by combining the Web Audio API and the Canvas API.
- Make the sustain duration of the ASDR envelope controllable by sustaining the sounds while the button is pressed down, and then releasing the sound when the button is released.
We've really only scratched the surface of computer synthesized sounds. A lot of research has gone into this field to discover how to create accurate sounding instruments that are completely synthesized, and it's possible to recreate any of these instruments using the Web Audio API.